… and everything in its place!
It’s impossible for me to say that phrase without hearing my mother’s voice in my head.
She declared that anytime she was ready to do an overhaul on our home and get things organized again. Although growing up, I’d say my mother was more organized in mind than in habit, her intentionality in home organization stayed with me. That said, I’d attribute my more obsessive need for order and structure to my father’s Type A personality, which I believe I inherited to a milder degree.
A word of warning:
When it comes to photo aesthetics, this post is not Martha Stewart worthy by any stretch of the imagination. My home is quite simple and dated in many ways. So if you’re looking to satisfy your need for the latest trendy home decor photo inspo, you’ve come to the wrong place.
These are just snapshots of organized areas that function well for my family’s needs. Some of them were built by my husband, others were thrown together by me with spare containers, repurposed product packaging, or dollar store finds.
Let’s dive in!
Entrance and Baskets
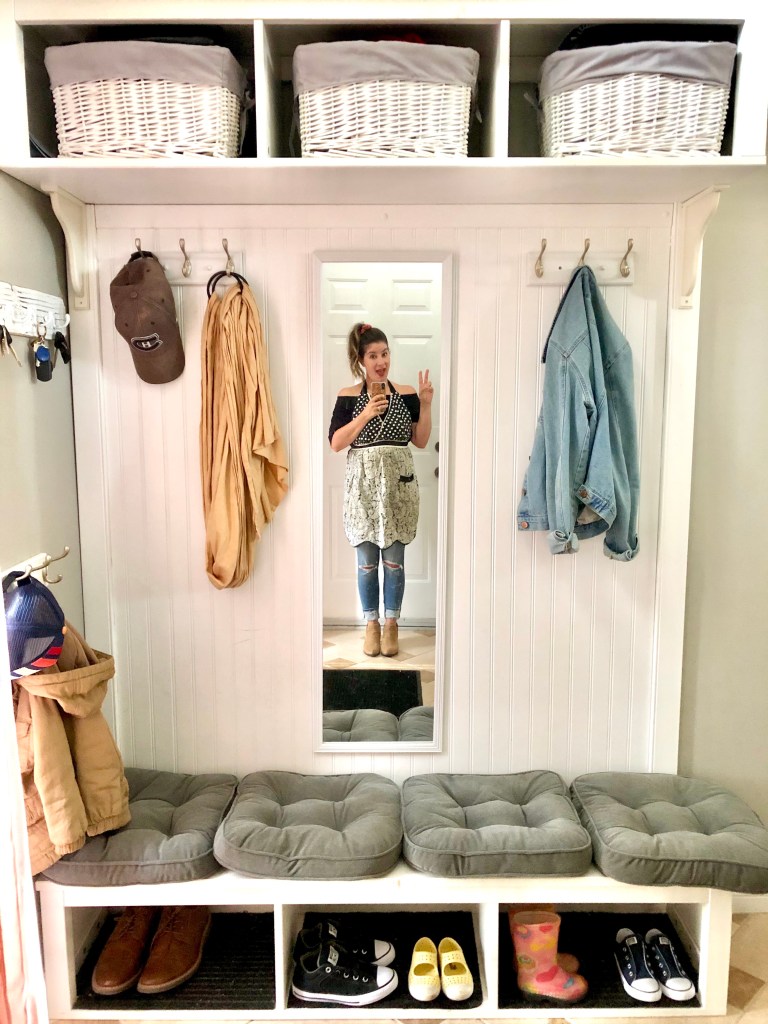
When we moved into our home, our entrance was nothing but blank walls, and the nearest entrance closet was only accessible by climbing a flight of stairs. Hello – not practical! Especially with kids!
Enter my handy husband with a creative flare. We already had a couple of IKEA shelves that we weren’t using. So he placed one on the floor, the other was secured to the wall, and between them my husband built what you see in the photo below. Kid and adult-height hooks were installed, and a mirror was hung in the middle. Baskets were purchased for cold weather accessories, and our entrance now had a home for footwear, coats, keys, shades, and more. This has been one my favourite and most practical additions to our home.
Takeaway Tip:
Baskets! Baskets! Baskets!
Baskets are an easy way to hide the chaos of storage, even if you’re not particularly organized. If you peak into those baskets, there’s nothing orderly about their contents at all. But it looks like we’re super organized, and sometimes that’s just the goal!
Hooks! Hooks! Hooks!
I still don’t think my kids can hang coats on a hanger, but a hook? We’ve got that down! It’s much easier to keep an entrance organized if kids can hang their own coats and jackets.

Junk Drawers
The easiest way to bring order to the chaos of a junk drawer is to add storage containers where junk items can be placed. So even if you’re not organized by nature, a few containers within a junk drawer will help keep things tidy.
If you’re feeling particularly orderly, try to organize your junk by size or category. The picture below has a container for essential oil rollers, one for quick mending supplies like needles and thread, another for pens and pencils, another for secret snacks, and one for miscellaneous items.
Takeaway Tip:
Reduce, Recycle… REUSE!
The majority of the containers in our junk drawers are boxes that once contained new iPhones or iPads, baby shoes, prescription glasses, etc. If the case is sturdy, it’ll be solid enough to house the random crap you’ve got lying around. This saves money AND the planet. Win-win!

Refrigeration and Tupperware
I cannot recommend Tupperware brand enough. And this isn’t even a sponsored post! My produce stays fresher so much longer when stored in FridgeSmart containers. To save space, the drawers where one would normally store produce now houses our dairy products such as milk, yogurt, and cheese.
For storing Tupperware or other plastic containers, this probably goes without saying, but just in case… Keep lids separate from the container and stack as best you can!
Takeaway Tip:
Buy the Tupperware! It is pricier than other brands but SO worth the investment. Frozen, microwaved, decades old, you name it. It is durable, practical, and makes a big difference in freshness for the food it’s storing. Again, not a sponsored post.

Endless Kitchen Utensils
When moving, the kitchen always takes the longest to pack and unpack. So it’s no surprise that it can easily become the most disorganized part of the house. Like I’ve already said, containers are an easy way to bring some order to your chaos without really trying. Some of the containers I use in our kitchen are from the dollar store (I know, I splurged here), but you can easily repurpose any containers that fit the utensils you’re storing.
Takeaway Tip:
Store items together that serve a similar purpose and/or are similar sizes. I have found this to be the easiest way to quickly find whatever I may be looking for, and also not misplace items I need.

Closet Hacks and Purging
When we moved into our home, this closet was, let’s just say…. in a very different state. The space wasn’t used to its potential so my husband came up with this layout using wall-mounted shelves, IKEA bookcases, curtain rods, and a dresser. In fact on top of that dresser is a small bookcase with the shelves removed and a curtain rod inserted in their place!
A custom closet makes it easier to stay organized. However, the most important thing is to maximize the space you do have by eliminating items that either don’t fit, or that you’re simply not wearing. When there’s less to put away, there’s less mess to be made. So….
Takeaway Tip:
Declutter! The 12 Month Rule: It can be hard to know where to start with decluttering your closet so I recommend this: If you haven’t worn an item in the last 12 months, there’s a very slim chance you will wear it again, so get rid of it! If this is too difficult, stretch it out to 24 months. You’d be surprised how few clothes are actually in regular circulation in your wardrobe, and how many just sit there waiting for their time to shine.

Folding Clothes: Marie Kondo-ish
After watching the Marie Kondo folding phenomenon I was amazed. But some of the techniques felt like too much work, so I modified a little to make it work for our spaces. Below are before and after shots of some of my husband’s drawers. I’m SO happy with the maximized space.
Takeaway Tip:
Fold shirts in thirds rather than halves and then stack them together like dominoes. You’ll save SO much space! I cannot recommend this enough. The second and third photos below featuring hoodies was a game changer too. That drawer couldn’t ever be closed and was always overflowing. I could easily fit a few more hoodies in there now using that technique. Message me if you’re interested in a video tutorial. It’s so quick and easy!

Built-In Dividers and Like-Item Storage
Our bathroom vanity has built-in dividers which helps make organization easier. Even with these separators, I still add our own containers to organize all the little things that a bathroom vanity holds.
Takeaway Tip:
Purge here too! Get rid of old makeup, product samples, or other unused items, and you’ll find it much easier to organize your space when there’s less to begin with. Keep items together that belong together. Makeup in one space, nail polish in another, hair products, lotions, etc.

No Dividers? No Problem!
I’m beginning to sound like a broken record, but if you haven’t caught on yet, get yourself some baskets and containers for storing items! Our kids’ bathroom doesn’t have any built-in dividers so I use dollar store baskets and repurposed containers similar to my junk drawer above to keep their toiletries organized.
Takeaway Tip:
Throw away expired medication! I’m sure I’ve had Advil older than my kids in some of these baskets. Anything unused and expired can be decluttered and thrown away to save space!

When Space is Limited
Our boys share a room, which means they share a closet. So far, we haven’t had to switch out clothes in season, though I’m sure that day will come. For now, this is how we’ve made it work:
- Two mid-length rods attached to the back wall for hoodies, dress shirts, jeans, etc
- Two drawers, each with short and long sleeve Ts in one; and shorts and sweatpants in the other
- A shelf along the top for thick sweaters
Takeaway Tip:
Again, the Marie Kondo-ish folding method has been such a game changer in this very limited space! Folding shirts in threes and then stacking them helps the boys see all their choices easily, and allows for more to be stored in their small spaces.

Utilizing the Space Under Beds
When you’ve got more than one kid in a room, you’ve got to find creative ways to use dead space. Under beds = dead space!
My husband used a piece of plywood, a few wooden crates, and tracks for drawers to build these custom storage drawers under a bed. They house big toys like trucks and construction tools for now. But mostly they make it easy to tuck toys away out of sight.
Takeaway Tip:
Maximize dead spaces! Custom drawers are just one way to do it. But even more easily, you can pick up shallow Rubbermaid bins for out-of-season clothes or toys and store them under beds. Alternatively, you can add vertical storage such as bookcases or other shelving with baskets to keep things organized and out of sight.

Playroom Organization
Keeping kids toys organized feels like an ongoing, uphill battle. If you can’t relate, you’re probably not raising children? The easiest advice I can offer is PURGE. And a place for everything, and everything in its place can probably be best applied to this context. We are always getting rid of toys that no one plays with so that whatever we DO keep is actually being used and has a specific spot to be stored in when not in use. We also clean up daily. So before bed, all toys are put away. This avoids the compounded build up of mess. So no matter what kind of toddler tornado hits on a given day, it all gets cleaned up at the end of it.
Takeaway Tip:
Purge Purge Purge! When there’s less to put away, there’s less to keep up with. An alternative to this: remove toys temporarily and reintroduce them periodically. Especially for younger ones, this keeps their options fresh and exciting as they likely won’t remember the toys in the first place and won’t get so overwhelmed by seeing too many option at once. Less is more!

Storage and Linen Closets
My favourite tip for closet storage is to use the plastic bags that comforters and bedding sets are packaged in upon purchase. Fold your items neatly with like-items (bedding, table cloths, towels, etc.) and store them together.
These bags are usually transparent so it’s easy to quickly find what you’re looking for when you need it! Whatever is used more frequently, make more accessible. For example, in the summer we keep beach towels on the main shelf, in winter months, throw blankets claim that spot.
Takeaway Tips:
- Store like-items together
- Use plastic packaging to keep things neat and visible
- Rotate seasonal items for easy access


Final Thoughts and Tips!
- Purge and declutter!
- Utilize baskets and reusable containers!
- Fold clothes the Marie Kondo way (ish)!
- Maximize vertical storage and dead space!